
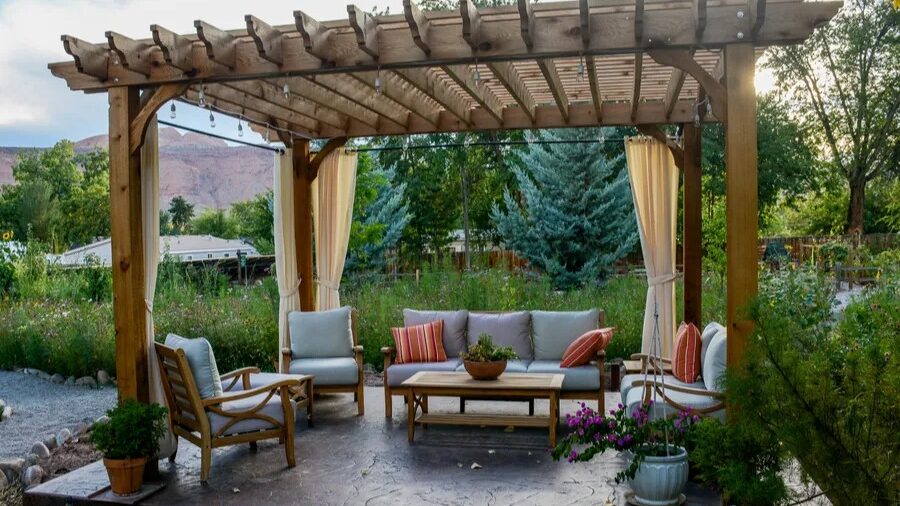
The first summer after we bought our fixer-upper, the patio was little more than a cracked slab and a picnic table we’d inherited from the previous owners. By noon, the concrete radiated so much heat that our dog refused to step outside, and every family meal became a frantic race against the sun. That’s when my spouse looked up from a sweaty burger and said, “We need shade—something that feels intentional, not just a floppy umbrella.” Enter the humble pergola: part architecture, part outdoor art installation, and absolutely within reach for a determined weekend DIY-er. Below is the plan I wish I’d had before we embarked on our DIY Pergola journey. With all the How To steps, this making building a pergola easy.
1. Dream & Design: Putting Vision on Paper
Before you touch a tool, walk your yard with a tape measure and a notepad at the hour you most crave shade. Note how the sun tracks, where foot traffic flows, and any underground sprinklers or electrical lines. Sketch a rectangle or square scaled to the patio furniture you already own (ours is 10′ × 12′, wide enough for a dining table plus clearance to scoot chairs). Get some inspiration here: Pinterest
Key design choices:
-
- Roof style: Classic open rafters let dappled light through; adding 1×2 slats perpendicular to the rafters tightens shade by about 30 percent. You can always retrofit a shade sail or polycarbonate panels later.
-
- Post placement: Posts outside the patio edge maximize floor area. Posts inset at the corners simplify footing layout.
-
- Headroom: Shoot for 8′ minimum finished height under the lowest beam so tall friends aren’t ducking.
-
- Local codes: Many municipalities allow freestanding shade structures under 200 sq ft without a permit, but verify setbacks and height limits first.
2. Materials & Tools: The Essential Shopping List
Below is what we used for a 10′ × 12′ pergola. Adjust lengths for your footprint.
| Item | Quantity | Notes |
|---|---|---|
| 6″×6″ pressure-treated posts (10′ long) | 4 | Larger posts look beefy and resist twist |
| 2″×8″ pressure-treated beams (12′ long) | 4 | Two per long side, doubled for strength |
| 2″×6″ rafters (10′ long) | 7–9 | 16″ on-center spacing looks balanced |
| 2″×2″ or 1″×2″ shade slats (10′ long) | Optional | Space 6″ apart for extra cover |
| Post anchors or concrete mix | 4 bags (80 lb each) | We chose concrete-filled footings |
| 1/2″ × 10″ galvanized carriage bolts with washers | 16 | For through-bolting beams to posts |
| 3″ exterior structural screws | 2 lb box | For rafters and slats |
| Stain or outdoor sealer | 1 gallon | Semi-transparent shows wood grain |
| Tools: post-hole digger, level, impact driver, circular saw, speed square, ladder, ratchet set |
Grab a pack of shims, extra drill bits, and a second pair of gloves; a friend who shows up “just to watch” will inevitably want to help.
3. Footings & Posts: Foundation First
Our rookie mistake was skimping on post layout—an hour saved turned into days of compensating for a crooked frame. Learn from us:
-
- Mark the footprint. Drive stakes at each corner, then run a mason’s line to outline a true rectangle. Confirm diagonals are equal.
-
- Dig post holes. Local frost depth is the guideline (in my mild climate, 18″). Holes should be 12″ wide.
-
- Set posts. Have a partner hold the first 6″×6″ while you pour two bags of fast-setting concrete and add water per instructions. Use a 4′ level on two faces before it stiffens. Repeat for the other three, bracing each with scrap lumber screwed to stakes.
-
- Let cure. Wait overnight; impatience here means a wobbly pergola forever.
Pro tip: Cut the posts a few inches taller than needed. It’s easier to trim the level later with a circular saw and a steady hand than to discover you’re short.
4. Beams: The Backbone of Shade
With posts plumb and solid, it’s beam day—a satisfying milestone because the pergola’s silhouette emerges.
-
- Snap a level line around all four posts at your target beam height (we chose 8′ 6″).
-
- Cut beams to length and notch or “birdsmouth” them if you like a traditional look, though flush beams are easier.
-
- Double them up. Have a helper lift the first 2″×8″ against the outside face of two posts; clamp, pre-drill, then drive two carriage bolts through each post–beam sandwich. The second beam sits on the inside face, bolts passing through both.
-
- Repeat for the opposite long side, checking level each time.
If you love decorative tails, trace a coffee-can arc onto each beam end and cut before lifting.
5. Rafters: Shade Starts to Happen
Rafters tie the beams together and dictate how much sun filters through.
-
- Layout. Mark 16″ centers across both beams. Number the marks so you won’t skip one mid-installation.
-
- Cut rafter length (10′ for our 10′ span) and notch a 1-1/2″-deep seat cut to rest over the beams—a Japanese-inspired touch that resists uplift.
-
- Install. Drop rafters into place and secure with two 3″ structural screws diagonally through each seat cut into the beam.
-
- Optional slats. Run 1″×2″s perpendicular to rafters, spacing 6″ apart, for near-solid shade.
When the afternoon sun first filtered through those crisp rafter shadows, my spouse did a little victory dance. Worth the ladder workout.
6. Finishing Touches: Protect & Personalize
Wood exposed to sun and moisture needs a finish within 30 days. Semi-transparent stains highlight grain; solid-color stains act like paint but won’t peel. Roll broad surfaces and use a brush on corners. Two thin coats trump one thick glop.
Add-ons we love:
-
- Retractable shade cloth on bicycle-gear pulleys for adjustable cover.
-
- Low-voltage string lights stapled under beams—ambience and late-night board game illumination.
-
- Hanging planters from rafter hooks; herbs overhead smell incredible.
7. Budget & Time Reality Check
Our total cost landed just under $850—much lower than the $3,000 quotes we got for a prefab kit—and we spread expenses over two paychecks by buying lumber first, hardware second. Labor was two long Saturdays plus stain day.
| Task | Active Hours | People |
|---|---|---|
| Post holes & concrete | 4 | 2 |
| Beam cutting & install | 6 | 3 (extra ladder holder) |
| Rafters & slats | 5 | 2 |
| Stain & cleanup | 3 | 1 |
Factor in snack breaks, neighbor gawking time, and the inevitable hardware run you swore you wouldn’t need.
8. Lessons From the Sawdust Zone
-
- Measure posts twice, brace once. We skimped on bracing and a gust twisted a curing post ¼”. The shim dance later was not fun.
-
- Invest in a sharp spade bit for carriage-bolt holes—splintered exits look amateur.
-
- Keep lumber shaded until installation; sun-baked boards warp quickly.
-
- Label rafters. A tiny “1-2-3” pencil mark on each seat cut prevents flipping one backward at the top of a ladder (ask me how I know).
9. Maintenance: A Shade Structure That Lasts
An annual spring rinse with the garden hose, a stiff-bristle scrub of any mildew spots, and re-staining every three to five years keep the pergola looking showroom fresh. Tighten carriage bolts each season; wood shrinkage can loosen hardware just enough to squeak in the wind.
If you opted for shade cloth, detach it before winter storms to prolong fabric life—ours still looks new after four seasons thanks to a $15 plastic storage tote.
10. The Payoff: Living Under the Pergola
Since finishing the build, we’ve eaten 50-plus dinners outside, strung up a projector for backyard movie nights, and even hosted a rainy-day brunch thanks to a quick tarp clip-on. The patio temperature under the rafters runs 10–15 degrees cooler than the open walkway, and the dog no longer yelps at the hot concrete—he sprawls in the shifting light, tail thumping against the post we dubbed “the canine thermometer.”
Final Thoughts
Building a pergola is part carpentry, part exercise, and part art project. The lumber will remind you it once was a tree—knots, bows, and all—and the sun will test every line you snapped. Yet somewhere between the first thunk of the post-hole digger and the last brushstroke of stain, you’ll feel the yard transform from exposure to invitation. A simple structure of beams and bolts becomes stage, shelter, and statement piece in one.
So grab your notepad, measure twice, and trust your level. A season from now, when golden hour slants through your very own rafters and friends raise glasses beneath the new shade, you’ll look back at the busted umbrella days and wonder why you waited so long. Here’s to building a little architecture, a lot of comfort, and the best seat outside the house—all in one satisfying DIY adventure.
Pingback: Backyard Design: The Ultimate DIY Backyard Ideas Guide