Introduction
Last June a hungry groundhog mowed my lettuce patch to stumps overnight. The next morning, armed with caffeine and mild rage, I vowed to build a diy garden fence that weekend—no contractors, no fancy blueprints, just common tools and stubbornness. Forty‑eight hours, fifteen fence posts, and one heroic neighbor’s post‑hole digger later, I had a sturdy, decent‑looking enclosure that still stands today. Below is the roadmap I wish I’d had, blending Extension‑office science with “oops, don’t do that” confessions so your first fence goes up straighter, faster, and cheaper.
Table of Contents
- Why Bother Fencing?
- Design & Planning
- Material Options
- Tools & Cost Breakdown
- Build Step‑by‑Step
- Finishing Touches
- Maintenance & Repairs
- Common Mistakes
1. Why Bother Fencing?
- Critter defense: Rabbits need only 2 × 2‑inch gaps; deer clear 6‑ft jumps. A tailored fence blocks them all.
- Pet containment: Dogs dig less when there’s a physical boundary.
- Visual frame: A tidy enclosure turns random beds into a cohesive garden “room.”
- Peace of mind: You sleep soundly knowing tomorrow’s salad isn’t tonight’s buffet.
2. Design & Planning
2.1 Map the Perimeter
Measure twice, dig once. I wrapped string around tomato stakes to visualize the footprint, then tweaked corners until wheelbarrow paths felt comfortable.
2.2 Height & Mesh Choice
| Pest | Height Needed | Mesh Opening | Bury Depth |
|---|---|---|---|
| Rabbits | 2 ft | ≤1″ | 6″ bent outward |
| Groundhogs | 3 ft | ≤1″ | 12″ bent outward |
| Deer | 6–8 ft | 2–4″ | none |
My fence is 5 ft of welded wire topped with twine “deterrent” lines; cheaper than going full 8 ft yet tall enough that deer now harvest elsewhere.
2.3 Gate Placement
Put the gate where you naturally enter, not where symmetry says it “belongs.” Mine aligns with the shed—tool runs are direct, muddy boots rejoice.
3. Material Options
| Material | Pros | Cons | Lifespan* |
|---|---|---|---|
| Pressure‑treated pine posts | Cheap, rot‑resistant | Green tint first year | 15+ yrs |
| Cedar rails & pickets | Bug‑repelling, beautiful | $$$ | 10–20 yrs |
| Welded wire (14 ga.) | Light, easy to staple | Bends if hit | 10 yrs |
| Livestock panels | Super strong | Heavy; truck needed | 25 yrs |
| Vinyl picket sections | Zero paint | Pricey; limited heights | 20 yrs |
*Assuming ground‑contact rated hardware and decent maintenance.
Budget hack: Combine PT pine posts + cedar top cap + welded wire infill for a rustic‑meets‑modern look at half the cost of full cedar pickets.
4. Tools & Cost Breakdown
Essential Tools
- Post‑hole digger or 2‑man auger (rent)
- 4‑ft level + scrap 2 × 4 brace boards
- Impact driver + exterior screws
- Fencing pliers or heavy staple gun
- Tin snips or angle grinder (for wire)
- Tape measure, mason’s line, spray paint
Weekend Budget (My 20 × 30 ft Garden)
| Item | Qty | Cost |
|---|---|---|
| PT 4 × 4 posts (8′) | 15 | $225 |
| 2 × 4 cedar rails (8′) | 30 | $210 |
| 50‑ft 14‑ga welded wire (5′ tall) | 3 rolls | $180 |
| 50‑lb fast‑setting concrete | 6 bags | $50 |
| Gate hardware + latch | 1 set | $28 |
| Exterior screws & staples | — | $30 |
| Total | $723 |
Your numbers vary by region, size, and lumber market mood swings, but $3–$4 per linear foot is a realistic DIY target—half to one‑third of contractor rates.
5. Build Step‑by‑Step
5.1 Set Corner & Gate Posts
- Dig holes ⅓ post length (about 2 ft for 8‑ft posts).
- Pour 6″ gravel for drainage.
- Plumb posts with braces; fill with fast‑set concrete to grade.
- Let cure 30 min (Fast‑2‑K is magic).
My goof: I skipped gravel on two posts; spring thaw heaved them ½‑inch. Digging them out mid‑season was not fun.
5.2 Run Guide Lines & Intermediate Posts
Stretch mason’s line between corners; mark 8‑ft centers. Set intermediates in tamped native soil to save concrete (fine for fences under 6 ft).
5.3 Attach Rails
Screw 2 × 4 rails flush with post faces: one 6″ above grade, one near top, a middle rail if fence exceeds 4 ft. Pre‑drill cedar to avoid splits.
5.4 Unroll & Staple Wire
- Unroll along the outside, keep tension with a buddy + 2 × 4 lever.
- Tack top edge first, then sides, finally bottom.
- Overlap rolls at least one mesh square and wire‑tie every 6″.
A cheap pneumatic stapler sped this step; manual pounding shook every wrist tendon.
5.5 Build & Hang the Gate
- Assemble a square frame from 2 × 4s; add a diagonal cross brace.
- Skin with wire or pickets.
- Hang on two heavy strap hinges; space for winter heave (½‑in gap).
- Level latch height for one‑handed exits with harvest baskets.
Gate tutorial video: “Square Frames That Stay Square” → [read more]
5.6 Bury a Dig‑Barrier (Optional)
For groundhogs, trench 12″ and bend wire L‑shape outward. Backfill with soil/rocks. Yes, extra labor—worth every bead of sweat when your beets survive.
6. Finishing Touches
6.1 Stain or Paint
- Clear oil: Show off cedar; reapply bi‑annually.
- Solid stain: Uniform color, hides mixed‑wood Frankenstein fences.
- Paint: Max pigment, but chips on wire knots—use stain on posts, paint only pickets if mixing.
Apply after wood dries to 15 % moisture (cheap meter saves guesswork).
6.2 Decorative Top Cap
Cap rails with a 1 × 6 to shed water and create a shelf for planters, solar lights, or resting a coffee mug during weeding breaks.
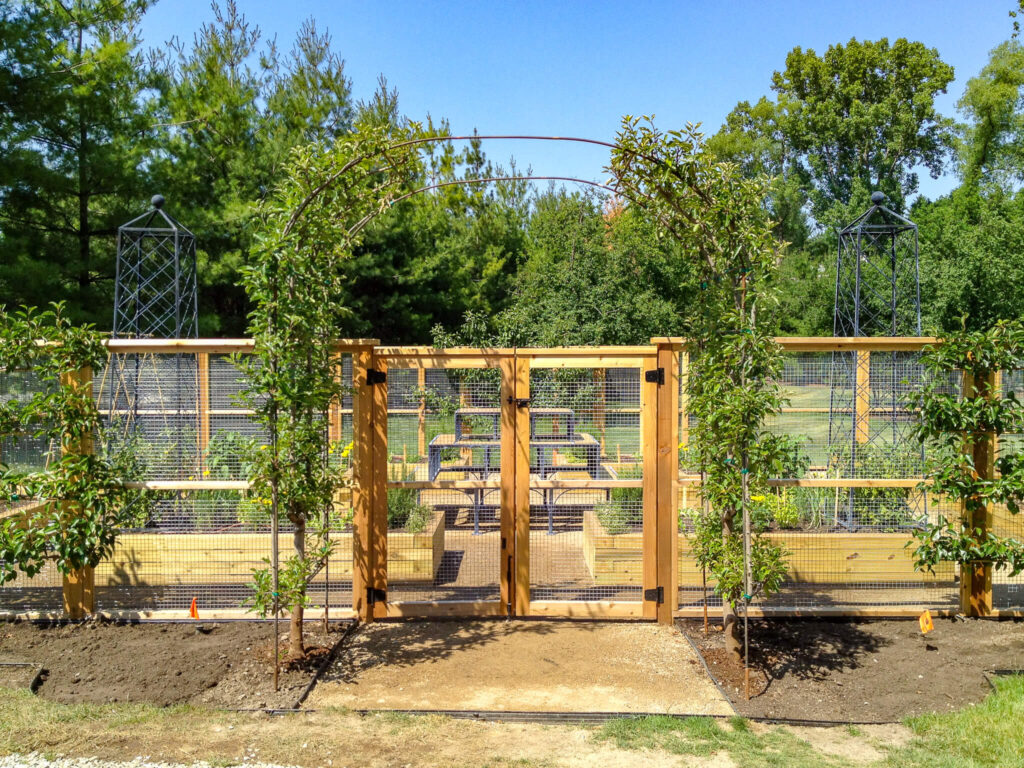
6.3 Climbing Trellis Panels
Attach cattle panel arches inside southern span; cucumbers climb up, casting dappled shade on lettuce below. Fence transforms into vertical garden wall.
6.4 Critter Door
Cut a 6 × 6 flip door at soil line if you like visiting turtles or toads; hinge with scrap leather so you can close during rabbit season.
7. Maintenance & Repairs
| Task | Frequency | My Notes |
|---|---|---|
| Inspect staples & ties | Spring/fall | Re‑drive loose staples before wire sags. |
| Check post plumb | Annually | Shim soil or tamp gravel if leaning. |
| Re‑stain exposed wood | 2–3 yrs | South faces fade fastest. |
| Oil hinges & latch | Yearly | Silicone spray stops squeaks. |
| Replace rust spots | As needed | Spot‑treat or splice new mesh section. |
A one‑hour walk‑around each spring prevents full‑day rehab later.
8. Common Mistakes (That I Totally Made)
- Skipping the survey map: I strayed 6″ onto my neighbor’s side—luckily he laughed, but city setbacks matter.
- Using interior screws: They rusted by fall; spend the extra $5 on exterior‑rated or coated.
- Pulling wire solo: One person can’t keep tension; enlist a friend or clamp/timber leverage.
- Under‑building the gate: Wide gates sag; add a diagonal and use long hinges.
- No dig‑barrier: First season’s spinach vanished down a woodchuck’s gullet—learned the trench lesson fast.
Closing Thoughts
Building a diy garden fence isn’t just hammering lumber; it’s an act of optimism—declaring that tomorrow’s harvest is worth today’s blisters. You’ll sweat, you’ll curse a crooked post, but when the first tomato ripens untouched by critter teeth, every sore muscle grins. Use the steps above, adapt them to your yard and wallet, and remember: perfection is optional, stability is not. Stain it, adorn it, let peas climb it—just get that barrier up and watch your garden thrive in newfound security.
Questions, fence‑fail horror stories, or victory photos? Drop them in the comments; I reply between tightening hinges and chasing squirrels. Until then, happy building and happier harvesting!